2020.06.14更新:
本文内容仍然可用,但已过时,请参照更新内容《Azure IoT Hub 获取设备上下线通知/设备生命周期的案例-利用事件网格事件订阅方式》
本文介绍:世纪互联Azure IoT Hub的一种获取设备上线通知的方案
视频介绍:
您可在B站观看视频介绍:https://www.bilibili.com/video/BV1dp4y1X7X3/
或在本站观看:
图文介绍:
对于Global Azure IoT Hub, 通过集成的和Event Grid的绑定即可获得物联网设备的上线下线事件,再通过配合逻辑应用或者Azure Function等其他paas服务可以实时的通知到自己的业务系统。
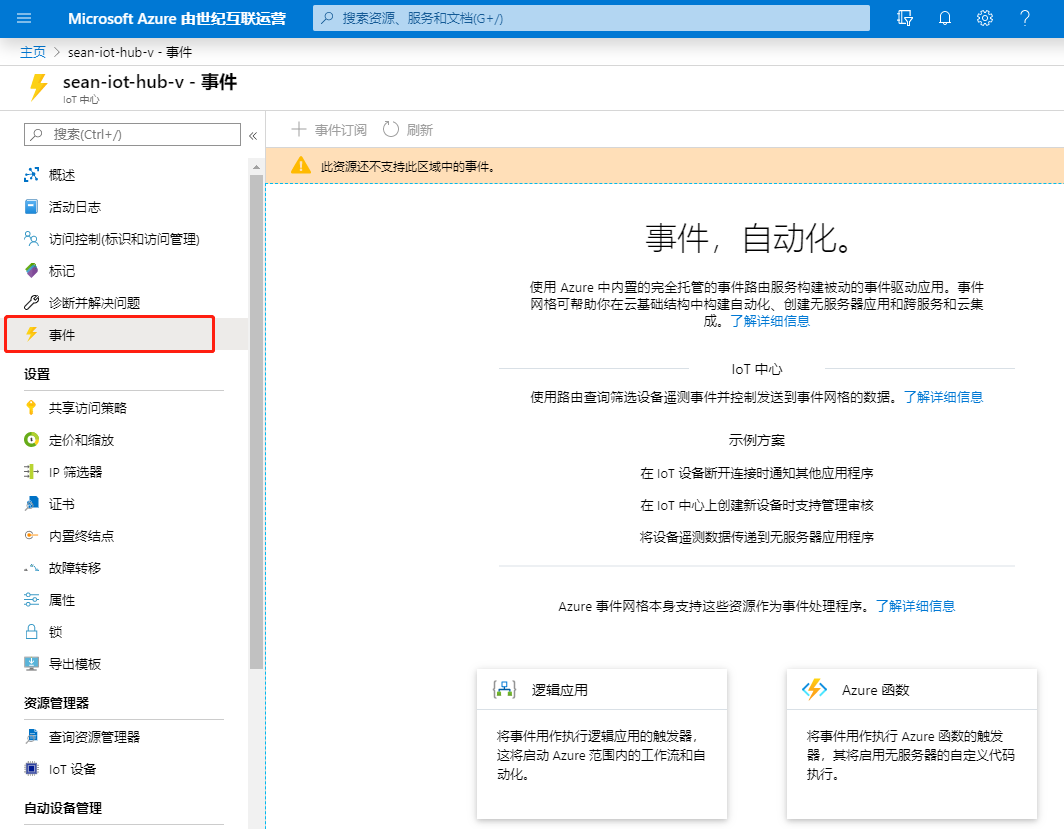
但是事件订阅的的功能截止到2020年4月,由世纪互联运营的Azure 尚不支持此功能,本文演示了一种在世纪互联运营的Azure IoT Hub中获取设备上线的方案,方案是开放的,其中的组件也是可以替换的,可根据实际业务架构进行调整。
本方案主要主要利用了消息路由功能,设备上线时发送特定的属性的消息,比如设定message.properties.add('messageType', 'onlinereport'), 根据该消息属性设定路由后,则可以将设备上线通知发送到特定队列或主题中,之后可以通过Functions 或者Logic APP或者 Service Bus的SDK将结果写入到特定的数据库中或者调用特定的Webhook。

重点步骤:
创建Service Bus及队列:

输入资源名称,本例中选择标准层级即可,选择区域,点击 审阅+创建:

点击创建:

创建完成点击“转到资源”

点击添加队列按钮,创建队列用于存放 设备上线消息:

创建队列输入一个队列名称,本例中其余保持不变

创建如下消息路由:
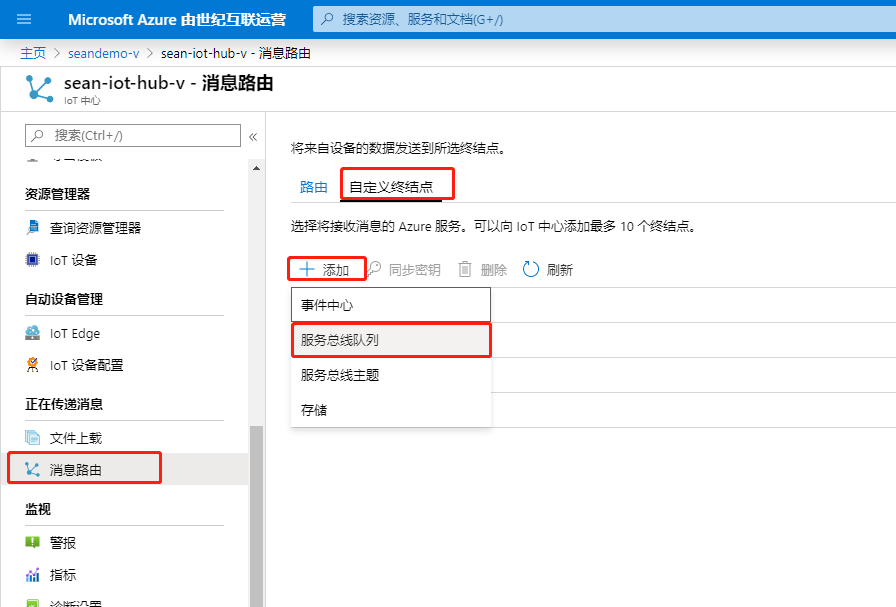
在Azure IoT Hub 消息路由中添加自定义终结点:
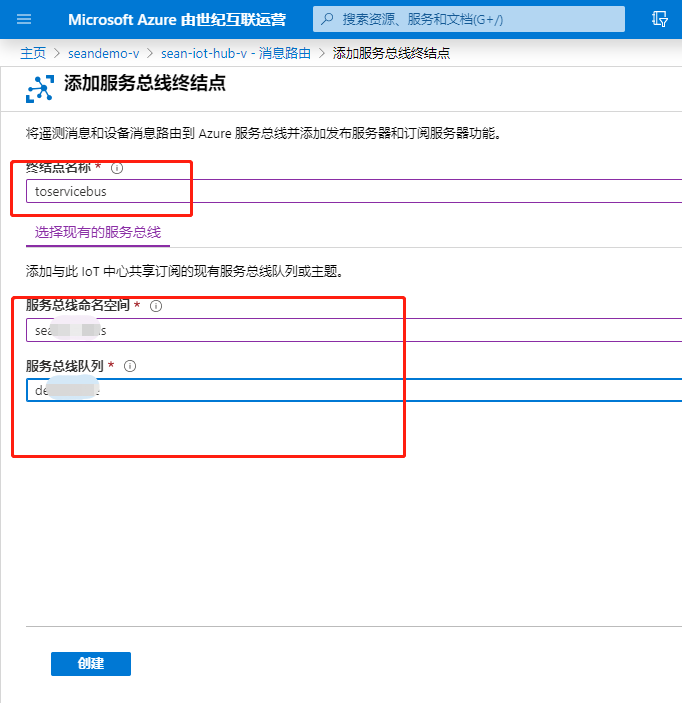
输入一个名称,然后选择刚创建好的Service Bus和队列:
点击添加路由:
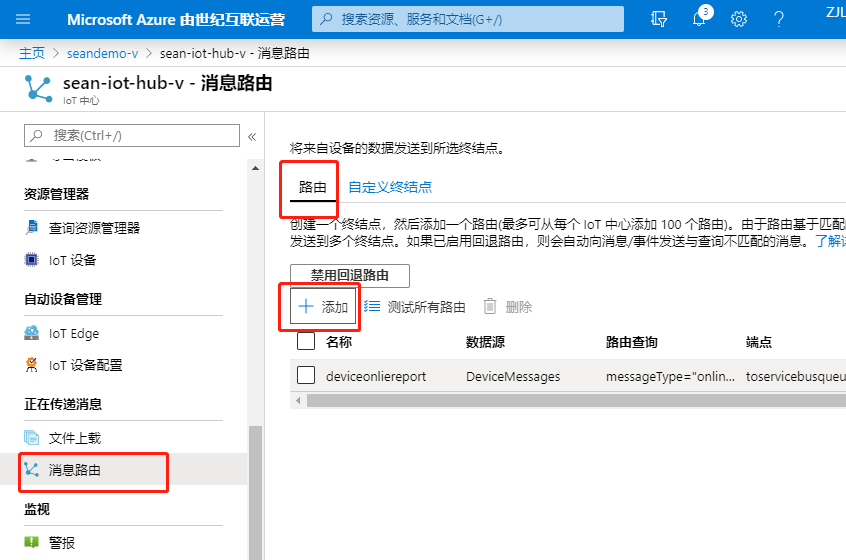
输入一个名称,在下拉列表中选择刚创建的终结点,输入路由条件:
messageType="onlinereport"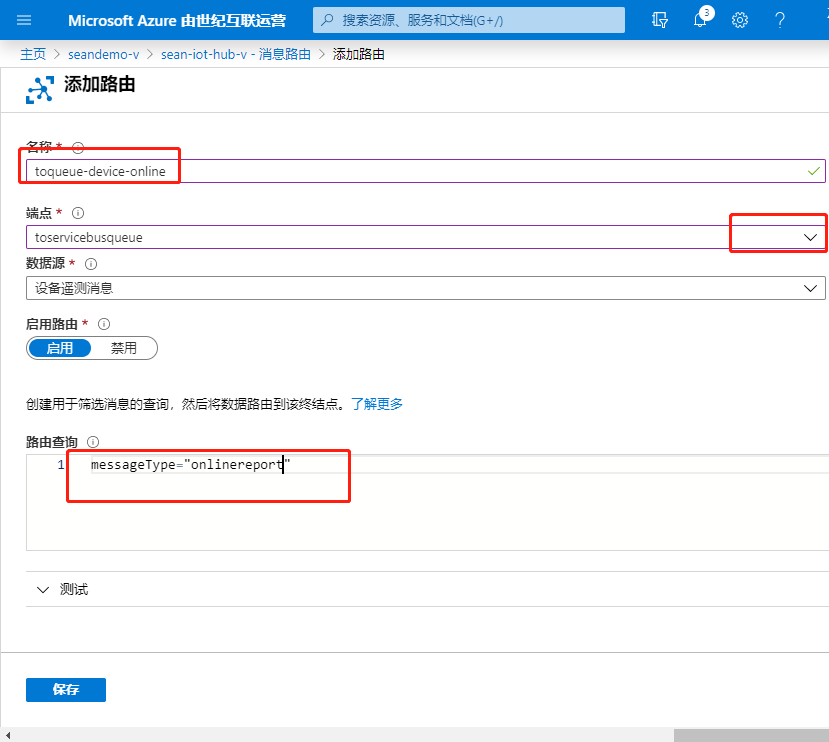
修改示例代码(node js):
关于Node.js示例代码的下载及使用,请参见如下文章:
- (视频)Azure IoT Hub 动手训练营 (1)- 前置条件(准备工作)
- (视频)Azure IoT Hub 动手训练营 (2)- 实验1,发送设备到云的消息和从云端控制设备(Node.js Device SDK /Service SDK)
'use strict';


// Using the Azure CLI:
// az iot hub device-identity show-connection-string --hub-name {YourIoTHubName} --device-id MyNodeDevice --output table
var connectionString = 'HostName=sean-iot-hub-v.azure-devices.cn;DeviceId=device001;SharedAccessKey=UfXj/60sNrwaCDbqjtcI3FIZsk60bfse1lizLLxuMUM=';


var Mqtt = require('azure-iot-device-mqtt').Mqtt;
var DeviceClient = require('azure-iot-device').Client
var Message = require('azure-iot-device').Message;

var client = DeviceClient.fromConnectionString(connectionString, Mqtt);

// send telemetry message every 10 seconds.
setInterval(function(){
  // Simulate telemetry.
  var temperature = 20 + (Math.random() * 15);
  var message = new Message(JSON.stringify({
    temperature: temperature,
    humidity: 60 + (Math.random() * 20)
  }));

  // Add a custom application property to the message.
  // An IoT hub can filter on these properties without access to the message body.
  message.properties.add('temperatureAlert', (temperature > 30) ? 'true' : 'false');
  message.properties.add('messageType', 'telemetry');

  console.log('Sending telemetry message: ' + message.getData());


  // Send the message.
  client.sendEvent(message, function (err) {
    if (err) {
      console.error('send telemetry error: ' + err.toString());
    } else {
      console.log('telemetry message sent');
    }
  });
}, 10000);


// send heartbeat message every 30 seconds.
setInterval(function(){
  var message = new Message(JSON.stringify({
    messageType: 'heartbeat'
  }));

  message.properties.add('messageType', 'heartbeat');
  console.log('Sending heartbeat message: ' + message.getData());

  // Send the message.
  client.sendEvent(message, function (err) {
    if (err) {
      console.error('send heartbeat error: ' + err.toString());
    } else {
      console.log('heartbeat message sent');
    }
  });
}, 30000);


//send Online report when device start

var message = new Message(JSON.stringify({
  messageType: 'onlinereport'
}));

message.properties.add('messageType', 'onlinereport');
console.log('Sending onlinereport message: ' + message.getData());

// Send the message.
client.sendEvent(message, function (err) {
  if (err) {
    console.error('send onlinereport error: ' + err.toString());
  } else {
    console.log('onlinereport message sent');
  }
});
在队列中验证设备上线消息:
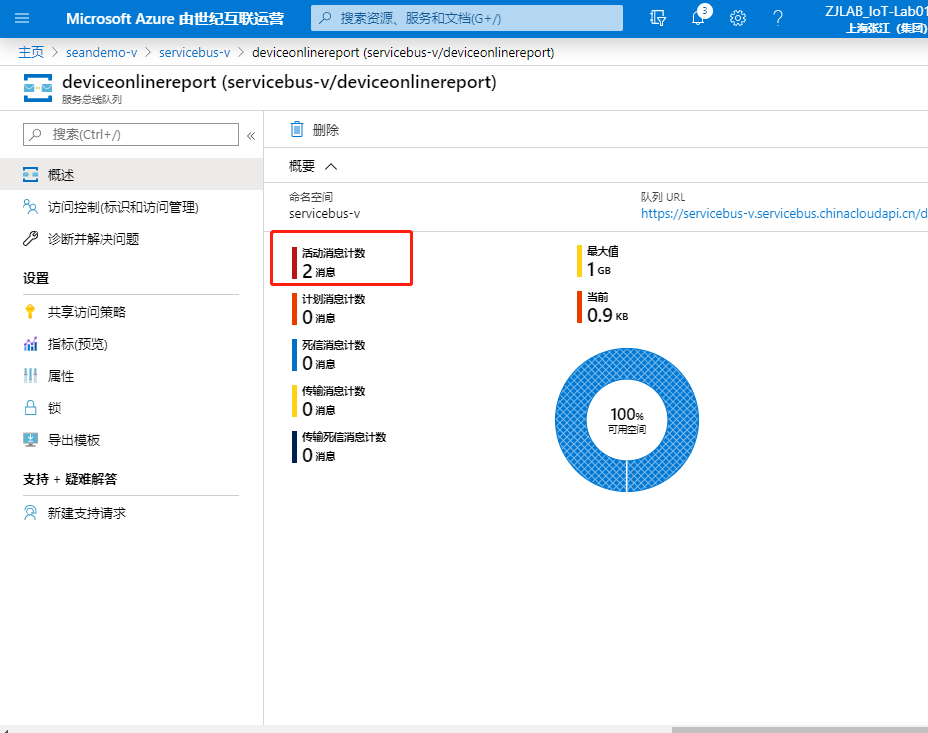
在工具中查看设备上线通知: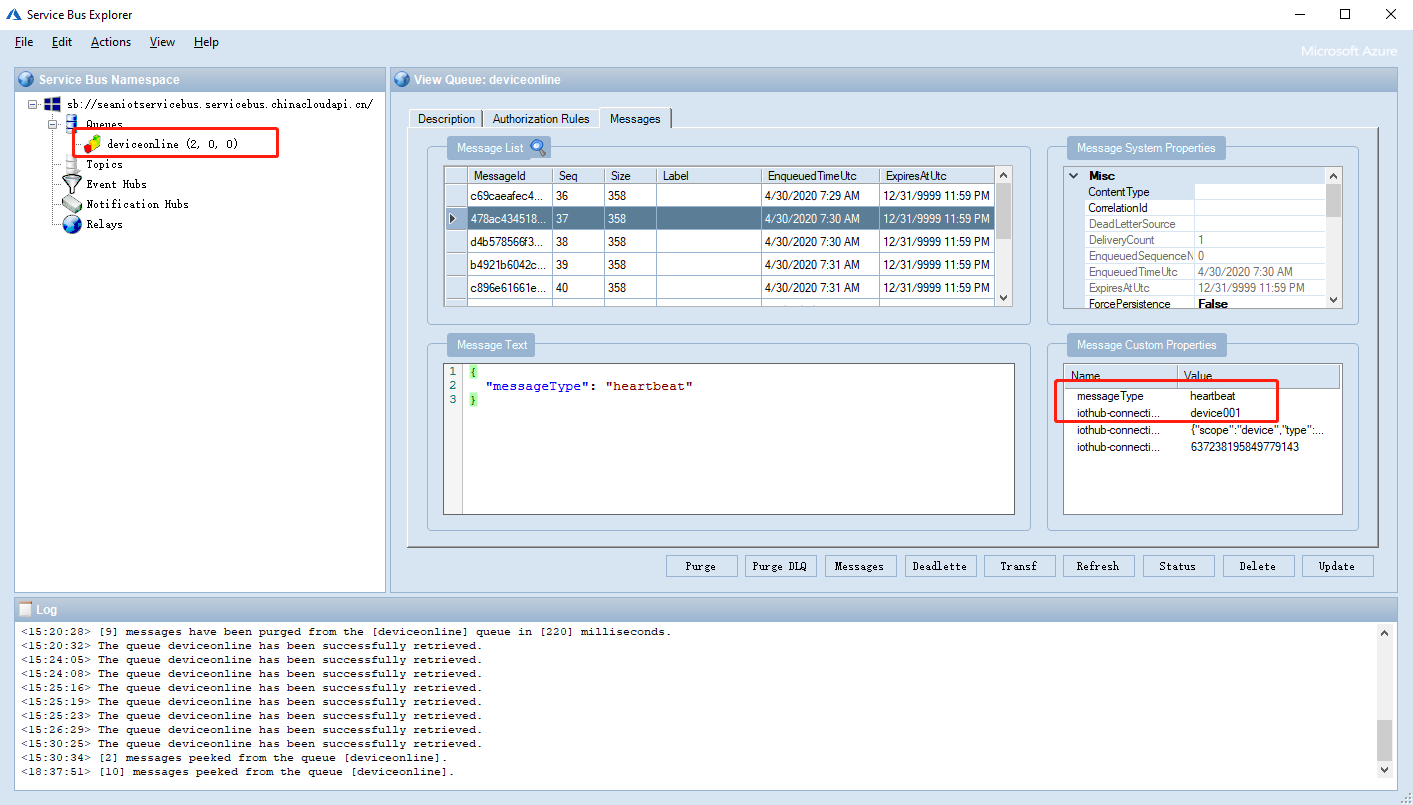
实际环境中,将该消息从消息队列取出使用Functions或Logic APP对该消息进行处理即可。

